

This is the last article of WebSocket series. I recommend you read WebSocket, Shrek, and AsyncAPI - An Opinionated Intro and Creating AsyncAPI for WebSocket API - Step by Step first.
In my previous articles from the WebSocket series, I introduced you to WebSocket topic and explained how you would describe your WebSocket API using AsyncAPI specification.
What was the point of doing it anyway? Why learning the specification?

Just to document your API? Nah, that would be a huge waste of time. Like seriously, would you learn a new specification only to describe the API for documentation purposes? Please don't. You could do so much more with it.
Look at the list of all the tools built for AsyncAPI. There are many ahead of us, but the current list already explains what can be done with AsyncAPI. You can validate your messages in real-time in your application with asyncapi-validator or mock and test your application with Microcks. You can also generate code by picking one of the official templates. In this article, I will focus on the aspect of code generation.
API-First vs Code-First
Designing API first and then coding later is not an easy shift. For a coder, it is easier just to code and focus on code aspects. And this is just fine. That is how humans work. We do what we learned and focus on making things good and maintainable. Different tasks require different skills, and it is ok that not everybody has them. Designing API requires a different look on the subject, being more flexible and abstract. You need a wider perspective, forget about implementation details, and think about the user first.
Do you need the specification to design API?
No, but specification makes the design process and feedback loop easier to handle and faster. If backed by good tools, of course.
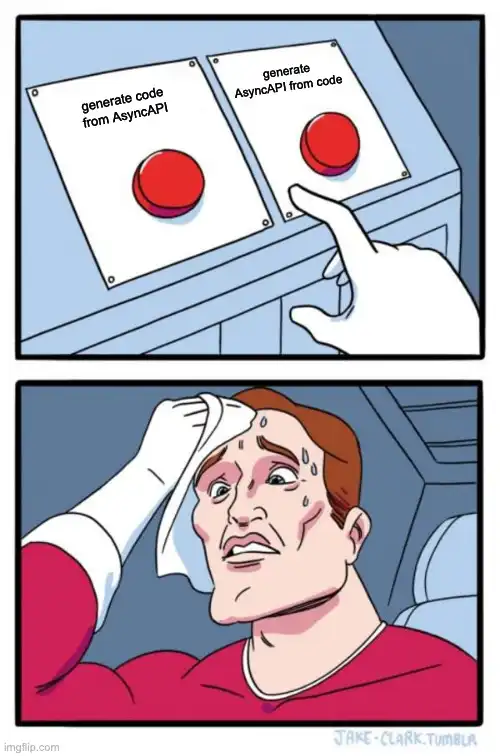
What is wrong with generating AsyncAPI from code?
Even though I'm an author of many memes like those in this article, I'm actually far from judging. It all depends on your project, architecture, and even the work environment.

In the end, I think there is a wrong assumption that if you generate spec from code, it means you did not think about API design and your users.
Even AsyncAPI tooling list stigmatize tools that allow you to generate spec from the code as code-first tools. Who said you couldn't do both things in parallel.
I just realized this topic could continue and evolve into a dedicated article, so let me do a full stop here.
My goal is to educate you on:
- Designing a WebSocket API with multichannel, with one message each. In other words, I want to show you something opposite to my previous articles where you could see a WebSocket API that has one channel but with multiple different messages.
- Performing code generation that enables you to focus on business logic only.
I'll try to come back into API-First vs Code-First topic in the summary of the article.
ShrekApp
I know that in this article
Write AsyncAPI document
You can see entire AsyncAPI document here
There are several questions you need to ask yourself when designing an API:
- What is the name of the API?
- What is the purpose of the API?
- What is the version of the API?
- How user can connect with the API and over what protocol?
- What messages can your user receive from and send to your API?
- On what channels are these messages available?
- What is the structure of these messages? What is the schema?
These are basic questions that can be reflected in the AsyncAPI document.
In case you didn't notice, these questions are user-oriented. Your AsyncAPI document must describe what users can do with your application and not what it does. It makes a difference.
Info
I'm designing a ShrekApp, release under 1.0.0 version. Its purpose is to enable chat with a chatbot trained to behave like Shrek. I want to use Wit.ai as a platform for training the bot that gives me a REST API to talk to the bot.
1 2 3 4 5 6 7 8 9info: title: Shrek App version: '1.0.0' description: | Purpose of this app is to have some fun with AsyncAPI and WebSocket and define an interface for ... Shrek.  You can use this API to chat with Shrek bot or to get updates about artifical travels to different locations.
Servers
The communication with the application goes over the WebSocket protocol. For now, it is not publicly hosted. You can run it locally and therefore connect through localhost only.
1 2 3 4servers: swamp: url: localhost protocol: ws
Channels
There are two separate entry points for the user to interact with the API:
chatwhere bi-directional communication is possible to enable real-time conversation with the bottravel/statuswhere user can subscribe for a stream of updates on different travels, like for example:1 2 3destination: Far far away distance: Beyond the seven mountains and seven forests arrival: Pretty soon
Except for basic information like the purpose of messages, pub/sub operations, and messages schema, it is good to specify operationId that is unique across the entire AsyncAPI document and helps to generate human-readable functions' names.
In the below example, you can see a usage of components section and schema definitions. I don't want to explain those sections in detail here as I did it already in the Creating AsyncAPI for WebSocket API - Step by Step article.
1 2 3 4 5 6 7 8 9 10 11 12 13 14 15 16 17 18 19 20 21 22 23 24 25 26 27 28 29 30 31 32 33 34 35 36 37 38 39 40 41 42 43 44 45 46 47 48 49 50# # Details about all the channels that user can listen to or send to messages # channels: /chat: subscribe: summary: Client can receive chat messages. operationId: subChatMessage message: $ref: '#/components/messages/chatMessage' publish: summary: Client can send chat messages. operationId: pubChatMessage message: $ref: '#/components/messages/chatMessage' /travel/status: subscribe: summary: Client can receive travel info status. operationId: subTravelInfo message: $ref: '#/components/messages/travelInfo' # # All reusable parts for readability and staying DRY # components: messages: chatMessage: summary: Message that you send or receive from chat payload: type: string travelInfo: summary: Message that contains information about travel status. examples: - payload: destination: Far far away distance: Beyond the seven mountains and seven forests arrival: Pretty soon payload: type: object properties: destination: description: Name of travel destination. type: string distance: description: How much distance left to the target. type: string arrival: description: Time left to get there. type: string
Final document
You can see the entire AsyncAPI document for ShrekApp always up to date here
The AsyncAPI document I just created is not very complicated as this way it will be easier to understand the generated code. Most important is for you to notice that all information about your application is expressed in the AsyncAPI document, and once you do it, options for the next steps are just endless.
Generate Code
It is time now to generate some code that enables you to focus just on the business logic.
AsyncAPI Generator
The AsyncAPI Initiative maintains the AsyncAPI Generator, a tool that enables you to generate anything you want out of an AsyncAPI document. Generator provides several features that make it much easier to provide so-called templates. The template is a standalone project that defines what files should be rendered by the Generator as a final output.
We have many templates on our list
1 2npm install -g @asyncapi/generator ag https://bit.ly/asyncapi @asyncapi/html-template -o example
Generate Server and Client
This article focuses on WebSocket therefore, I use our Node.js WebSocket template that is capable of generating server for WebSocket API and also a client that is aware of available channels.
- Create a new directory where you will work on the project:
mkdir shrekapp && cd shrekapp - Trigger generation using the template:
ag https://raw.githubusercontent.com/derberg/shrekapp-asyncapi-designed/main/asyncapi.yaml @asyncapi/nodejs-ws-template -o myapp -p server=swamp - Access generated folder and list all files from the directory. Notice that Node.js application is generated:
cd myapp && ls - Install application dependencies
npm i - Start the application
npm start
That is it. The basics are done. The application is ready, and all the basic logic is there. You can already interact with the application on localhost on port 80. Now you need a client able to communicate with WebSocket protocol. For now, we will not explore the generated client.
Get websocat (curl-like tool for WebSocket) by following these instructions
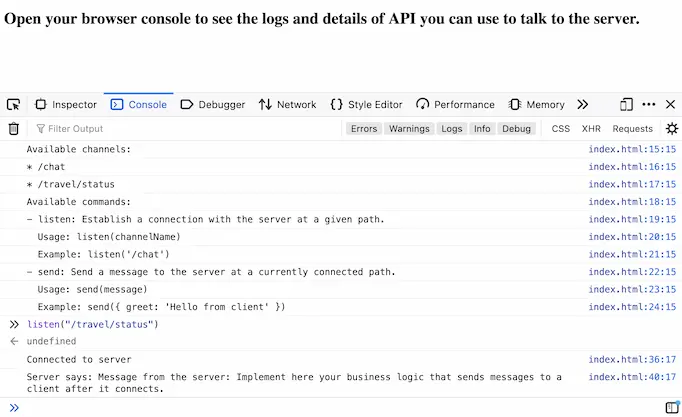
Connect to one of the channels and notice that the server sent you a message to respond to established connection.
1 2 3websocat ws://localhost/travel/status Message from the server: Implement here your business logic that sends messages to a client after it connects.
Logs in the running server should also indicate a new connection with the server:
1 2Listening on port 80 /travel/status client connected.
Code Walkthrough
Before writing some code, let's first go through the generated code:
- For the generated server, we need to look into
src/api/routes.jsandsrc/api/services - For generated client, everything is in the
index.html
Server Code
Router
Basing on the information provided in the AsyncAPI document about available channels, in the src/api/routes.js the following routes are generated:
1 2 3 4 5 6 7 8 9 10 11 12 13 14 15 16 17 18const { subChatMessage, pubChatMessage } = require('./services/chat'); const { subTravelInfo } = require('./services/travel-status'); router.ws('/chat', async (ws, req) => { const path = pathParser(req.path); console.log(`${yellow(path)} client connected.`); await subChatMessage(ws); ws.on('message', async (msg) => { console.log(`${yellow(path)} message was received:`); console.log(util.inspect(msg, { depth: null, colors: true })); await pubChatMessage(ws, { message: msg, path, query: req.query }); }); }); router.ws('/travel/status', async (ws, req) => { const path = pathParser(req.path); console.log(`${yellow(path)} client connected.`); await subTravelInfo(ws); });
In the case of this particular template, routes are handled by Express framework and express-ws middleware.
First let's have a look at /travel/status route:
1 2 3 4 5router.ws('/travel/status', async (ws, req) => { const path = pathParser(req.path); console.log(`${yellow(path)} client connected.`); await subTravelInfo(ws); });
Once the client establishes connection with the server, generated code invokes a function called subTravelInfo. Now look again at the AsyncAPI document:
1 2 3 4 5 6/travel/status: subscribe: summary: Client can receive travel info status. operationId: subTravelInfo message: $ref: '#/components/messages/travelInfo'
The name of the function maps to the operationId. The /travel/status channel supports only subscribe operation which means that client can only connect to the channel to listen for the messages, no messages are accepted. This is why the generated router doesn't react to any message sent to the channel. As oposite to the /chat channel:
1 2 3 4 5 6 7 8 9 10router.ws('/chat', async (ws, req) => { const path = pathParser(req.path); console.log(`${yellow(path)} client connected.`); await subChatMessage(ws); ws.on('message', async (msg) => { console.log(`${yellow(path)} message was received:`); console.log(util.inspect(msg, { depth: null, colors: true })); await pubChatMessage(ws, { message: msg, path, query: req.query }); }); });
The subChatMessage function is invoked when client connects with the server. There is also a message listener generated that invokes pubChatMessage function whenever a message is sent from the client. Now look again at the AsyncAPI document:
1 2 3 4 5 6 7 8 9 10 11/chat: subscribe: summary: Client can receive chat messages. operationId: subChatMessage message: $ref: '#/components/messages/chatMessage' publish: summary: Client can send chat messages. operationId: pubChatMessage message: $ref: '#/components/messages/chatMessage'
The client can not only listen to the messages incoming from /chat channel but, in this case, can also send messages. This way, there can be bi-directional communication established between the client and the chatbot.
Services
Functions like, for example, pubChatMessage are generated in the services directory. All functions for single channel go into individual file. Have a look at src/api/services/travel-status.js file:
1 2 3 4 5 6 7 8 9const service = module.exports = {}; /** * Client can receive travel info status. * @param {object} ws WebSocket connection. */ service.subTravelInfo = async (ws) => { ws.send('Message from the server: Implement here your business logic that sends messages to a client after it connects.'); };
As you can see, you are ready to provide your business logic by replacing the generated one:
ws.send('Message from the server: Implement here your business logic that sends messages to a client after it connects.');Client Code
The Node.js WebSocket template that I use for this article also generates index.html file to showcase that client generation is also possible using AsyncAPI document. As I mentioned in the beginning, with AsyncAPI and the AsyncAPI Generator, you can generate whatever you want.
The index.html contains a simple API that you can call from the browser's console to talk to the WebSocket API. Open the file in the browser and play with the API:
Add Business Logic
The Business logic goes only to generated services.
Add Travel Status Updates
I don't have here any real travel status updates. I add some dummy data that are sent to the client every 1s, 100 times.
Add dummy-json that makes it easier to provide mock data. I add it only to make sure the code is not overcomplicated
npm i --save dummy-jsonImported the package in the src/api/services/travel-status.js file:
const dummyjson = require('dummy-json');Modify subTravelInfo from the same file to send mock data to the client with ws.send() function:
1 2 3 4 5 6 7 8 9 10 11 12 13 14 15 16 17service.subTravelInfo = async (ws) => { (function myLoop (i) { setTimeout(() => { ws.send(generateResponse()); if (--i) myLoop(i); }, 1000); }(100)); function generateResponse() { const template = `{ "destination": "{{city}}", "arrival": "{{int 2 6}}h", "distance": "{{int 18 65}}km" }`; return dummyjson.parse(template); } };
This is it. Now restart the server and check with previously installed websocat if after connecting to travel/status channel you are now regularly receiving a stream of messages:
1 2 3 4 5 6 7 8 9 10websocat ws://localhost/travel/status { "destination": "Woodville", "arrival": "4h", "distance": "60km" } { "destination": "Denver", "arrival": "3h", "distance": "60km" } { "destination": "Fargo", "arrival": "3h", "distance": "42km" } { "destination": "Exeter", "arrival": "2h", "distance": "62km" } { "destination": "Bradford", "arrival": "2h", "distance": "55km" } { "destination": "Toronto", "arrival": "6h", "distance": "28km" } { "destination": "Durham", "arrival": "5h", "distance": "59km" } { "destination": "Canterbury", "arrival": "4h", "distance": "50km" }
Add ChatBot Communication
I chose Wit.ai as a platform that:
- Makes is super easy to train the bot
- Gives me access to API that enables integration with custom services, like the one that we just generated
I encourage you to give it a try as it is pretty easy to use if it is your first time with ChatBots. It was my first time.
To make it easier to talk to Wit.ai API I use node-fetch package:
npm i --save node-fetchImported the package in the src/api/services/chat.js file:
const fetch = require('node-fetch');Modify subChatMessage from the same file to send to the client message that connection is working:
1 2 3service.subChatMessage = async (ws) => { ws.send('Connection with Shrek established'); };Modify pubChatMessage that is invoked when message from the client gets to the /chat channel:
1 2 3 4 5 6 7 8 9 10 11 12 13 14 15 16 17 18 19 20 21 22 23 24 25 26 27 28 29service.pubChatMessage = async (ws, { message, path, query }) => { const messageToShrek = message ? encodeURIComponent(message) : ''; const defaultAnswer = 'Shrek is out sorry. He\'s busy rescuing the princess.'; let shrekAnswer = defaultAnswer; let botAnswer; try { botAnswer = await fetch(`https://api.wit.ai/message?q=${messageToShrek}`, { headers: { 'Authorization': `Bearer ${process.env.CHATBOT_TOKEN}` } }); } catch (e) { throw new Error(`Having issues communicating with the bot: ${e}`); } if (botAnswer) { const wrongQuestionAnswer = 'Is it you Donkey!? Ask a better question!'; const answerObject = await botAnswer.json(); let firstTraitValue; for (const [, v] of Object.entries(answerObject.traits)) { firstTraitValue = v[0].value; break; } shrekAnswer = firstTraitValue ? firstTraitValue : wrongQuestionAnswer; } console.log(`Answered with: ${shrekAnswer}`) ws.send(shrekAnswer); };
The most important part of this code is when the communication with the Wit.ai platform happens to send a message and get a response:
1 2 3botAnswer = await fetch(`https://api.wit.ai/message?q=${messageToShrek}`, { headers: { 'Authorization': `Bearer ${process.env.CHATBOT_TOKEN}` } });
This is it. Now restart the server and check with previously installed websocat if after connecting to chat channel you can send messages to chatbot and receive answers. You need to start the server with CHATBOT_TOKEN environment variable with the token: CHATBOT_TOKEN=your-token npm start. I cannot give you my token, sorry, you have to get yours from Wit.ai and train your chatbot:
1 2 3 4 5 6 7 8 9 10 11 12websocat ws://localhost/chat Connection with Shrek established Me: Hi Shrek Shrek: hey, do you know ogrs have layers? Me: Interesting Shrek: are you mocking me? Me: Why would I? I like you Shrek: Is it you Donkey!? Ask a better question! Me: No, not a donkey Shrek: good
You can also see logs on the server-side:
1 2 3 4 5 6 7 8 9 10 11 12 13 14Listening on port 80 /chat client connected. /chat message was received: 'Hi Shrek\n' Answered with: hey, do you know ogrs have layers? /chat message was received: 'Interesting\n' Answered with: are you mocking me? /chat message was received: 'Why would I? I like you\n' Answered with: Is it you Donkey!? Ask a better question! /chat message was received: 'No, not a donkey\n' Answered with: good
Summary
If you do not want to go through all the steps of getting the generated code, you can directly use this project. It contains everything mentioned in this article.
As you could see, the only coding part was just business implementation details, and the rest was generated. When I worked on this article, I focused first on the API. My main goal was to write the AsyncAPI document first, and the rest was easy.
Are you convinced now that API-first is better than code-first?
I'm an API-first person. I can go on and give you many arguments that support my view.
I won't do it.
Instead, I will honestly tell you what the problems are related to API-first and code generation. You judge what is the path you want to take.
AsyncAPI 2.0 Limitations
As I mention in this article and the previous ones on WebSocket, you write AsyncAPI document for your application from a client perspective. When you start designing your API, you ask yourself questions from the user's perspective.
Don't get me wrong; I'm not saying that taking user perspective is wrong. It makes sense but also confusing for many. I recommend joining this thread for more details.
Confusion between subscribe and publish is not the only problem. Once you understand that your application that publishes events must describe it as subscribe operation, the rest is trivial.
The real problem is with code generation. You describe the application from a user perspective, so client code generation is easy. What about generating code for your server? Have a look again at the /travel/status channel from ShrekApp:
1 2 3 4 5 6/travel/status: subscribe: summary: Client can receive travel info status. operationId: subTravelInfo message: $ref: '#/components/messages/travelInfo'
I had to try hard to make sure the summary and operationId are as neutral as possible. My first version looked like this:
1 2 3 4 5 6/travel/status: subscribe: summary: You can listen to travel info status. operationId: onTravelInfo #client code perspective, generated client reacts "onTravelInfo" incomming message message: $ref: '#/components/messages/travelInfo'
Then in src/api/services/travel-status.js file, I would have onTravelInfo instead of subTravelInfo with the following jsdoc:
1 2 3 4 5 6/** * You can listen to travel info status. * @param {object} ws WebSocket connection. */ service.onTravelInfo = async (ws) => { ...
This is a function responsible for sending messages to the Client once it connects with a given channel. Function name like onTravelInfo is misleading, not to mention the generated code description.
I chose neutral descriptions. They are acceptable, I think, but not when it comes to user-facing documentation. Every technical writer will tell you that the best docs are the ones that are directed to a reader. You don't write "what user can do with the API" but "what you can do with the API".
Therefore, all descriptions and even things like operationId should have two versions to satisfy both docs and code depending on the perspective. Otherwise, you need to make a sacrifice. You either make the developer that maintains the code happy or the technical writer that maintains docs happy.
Join the discussion around operationId.
Keeping AsyncAPI in Sync With Code
In this article, I generated a server that was easy to extend, to showcase AsyncAPI capabilities. Using such projects is a way for building prototypes and quickly design architectures. You can even scaffold a server that later you can tune and use on production.
You did your work, you did API-first.
What happens later? I mean later during further development of the application.
Let's say you add a new channel to the server or modify the name of the old channel.
Where do you do it? AsyncAPI document or the code? You need to do it manually in both. You need to add a channel to the AsyncAPI document and add implementation for the channel in the code. You enter the land where your AsyncAPI document describes something different from your code at some point in time. You cannot regenerate the project with the template you used in the beginning, as your custom logic will be lost.
The AsyncAPI Generator provides support for Git. If you have a Git repository and unstaged files, the Generator warns you that your changes may be lost. Git support is definitely helpful. You can try code regeneration, but you need to review changes and manually ignore overrides after that.
It can be a cumbersome process, but you maintain sync between the AsyncAPI document and the code. There is no place for automation, though.
There must be a way to solve these challenges. Maybe some kind of markers. One could use them in code to indicate that the generator must ignore a given part of the code. Another helpful solution could be a way to specify what template files should be ignored during generation. For example, regenerate only models built from messages' schemas. We need to figure it out.
Don't give up, though. Technical challenges are not a good excuse for avoiding the API-first approach.

In my opinion, specification limitations and gaps in tooling support should not block you from choosing an API-first direction. The benefits are too big to resign that easily. Just join us and let us find solutions together. We want to help solve all those issues, but we just need some help from you too.
That would be it. Thanks for staying with me until the end. Don't forget to read my previous articles on AsyncAPI spec and WebSocket protocol. Share your feedback and connect with the AsyncAPI community in our Slack workspace.
